|
|
|
Chiseled Cutout Frame Tutorial
See bottom of the page for my Terms of Use.
This tutorial was written for Paint Shop Pro version 7 but can
also be achieved in earlier
versions.
These are the tools you will need to complete this tutorial
1. Paint Shop Pro - Click here to get a free 30 day trial.
2. Ulead Art Texture - Click here to get the free download.
3. Fantastic Machine's Paint Engine - Click here to get the free download.
4. You will need the mask I used to make this image, or you could try one of
your own - Download. Just extract the files to your masks
folder.
5. If you would like to use the image I am using: Right click on the image
below, choose "Save Target As" and save the image to your hard drive.
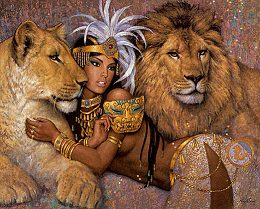
Artwork © Karl Bang
Let me just preface this by saying that some of the steps I include here are just suited to my preferences. Some may seem unnecessary, but they are how I tweaked it to enhance certain aspects. I am showing you exactly how I made the graphic above. Feel free to experiment and come up with your own enhancements. Okay, let's get started!
Because this tutorial involves a lot of little steps, it would be very helpful to you to click on the examples below for a larger image. They will open up in a new window.
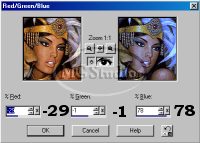
Open biglionprincess.jpg (or the image of your choice). Hit shift and D on your keyboard (at the same time), and close the original file. Go to 'Colors > Adjust > Red/Green/Blue'. Use these settings: Red = -29, Green = -1, Blue = 78. (If you are using your own image, change these settings to something to fit that image)
Hit shift and D on your keyboard again. Save the copy as a psp
file - so you don't lose anything by optimizing, then close it. It's always good to have a copy of the image you are starting with. You can resize the image now if you choose. I like to work big, and resize later. Open up cutoutmasks.zip and extract the files to your masks folder. Go to 'Masks > Load From Disk...'. Select chisel.msk and click open. It should like this:
Use the dropper tool to set your foreground color to one of the darker
colors from your image. I used #504A8E. Add a new layer either using
your layer palette or by going to 'Layers > New Raster Layer'. Name the layer 'Texture'. Flood fill this layer with your foreground color.
Go to Effects > Plug-in Filters > Fantastic Machines > Paint Engine > setting = "bold" --> Brush = .22 / -.6 / .00 / 1.11 / .4 / .07 / Effect = 1.66 / wrap edges unchecked / Stroke = Uphill+Intensity1 / input and line unchecked / 19 / 1.00 / 5 / 25 / 35 / 2 / Direction Channel = R // { these are the settings in case you do not have this preset.}
Repeat 4 times. Go to 'Effects > Sharpen > Sharpen More'. Then, go to 'Effects > Sharpen > Sharpen'. Apply Paint Engine filter 2 more times. Then, 'Sharpen More', and 'Sharpen' again. Go to 'Masks > Load From Disk...'. (So, in total you perform the Paint Engine filter 7 times). Select chiselinvert.msk and click open. It should like this:
The texture on your image may vary depending on what color you use for your flood fills. Change the name of the image layer to 'Picture'. Add a new layer, name it 'Bottom', and move it underneath the Picture layer. Flood fill the layer with your foreground color.
Duplicate the Texture layer. Rename the copy 'Light Texture'. Go to 'Colors > Adjust > Red/Green/Blue'. Use the same settings as before. Change the layer's opacity to 75.
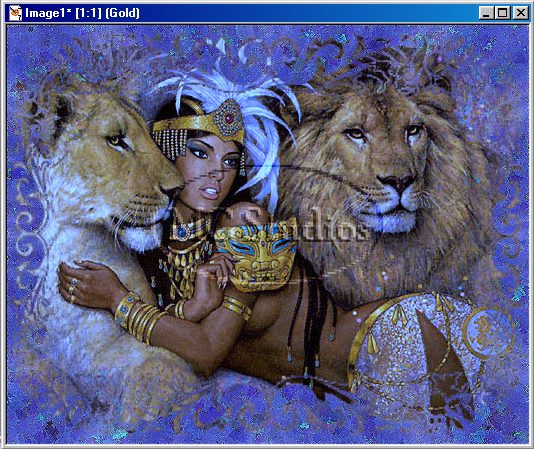
Click once on the Texture layer and add a new layer - name it 'Gold'. Flood fill with your foreground color. Go to Effects > Plug-in Filters > Ulead Effects > Art Texture. Click on the Edit button. Click on the Palette 5 image on the right. Click okay. Under Pattern Samples, click on the button that looks like this:  . Click okay. Go to 'Masks > Load From Disk...'. Select chiselinvert.msk and click open. It should like this: . Click okay. Go to 'Masks > Load From Disk...'. Select chiselinvert.msk and click open. It should like this:

Click on the Picture layer and turn off the visibility for all of the other layers. Go to 'Layers > Merge > Merge Visible'. Rename your newly merged layer 'Picture'. Go to 'Selections > Select All'. Select your Magic Wand tool, Match Mode=RGB Value, Tolerance=10, Feather=0'. Click in the center of the picture. This will give you an exact selection around all the nooks and crannies.
Go to 'Effects > 3D effects > Cutout --> Vertical=-3 / Horizontal=-3 / Opacity=100 / Blur=5 / Black // > Click OK. Repeat 3 times. Now, perform the cutout again, only change the Vertical and Horizontal to 3. Repeat 3 times. (So, you performed the cutout effect a total of 8 times). When this is done, your Picture layer should look like this:
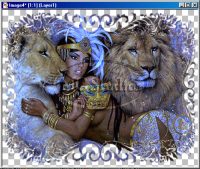
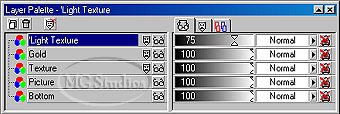
Now, turn on the visibility for the rest of your layers. At this point,
your layer palette should look like this:
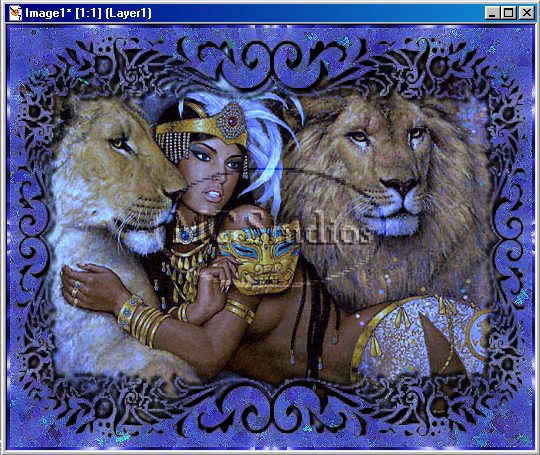
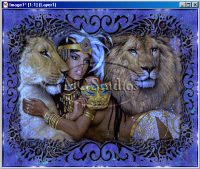
And your image should look like this:

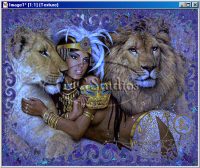
Save, and hit shift and D on your keyboard again. This is optional, but I just like to save the layered version of the graphic before I add a border, which merges the layers. Save the copy as a psp file, then close it.
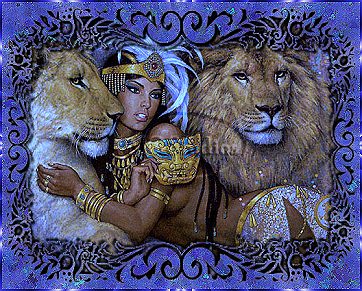
Go to 'Image > Add Borders - Symmetric checked, 4'. Select the border with your magic wand tool, and apply the Art Texture filter with the same settings as above. Do not deselect. Go to 'Colors > Colorize, Hue 171, Saturation 101' (If you are using your own image, change these settings to something to fit that image).
Go to 'Edit > Copy'. Go to 'Edit > Paste > As New Layer'. Deselect. Go to 'Layers > Properties'. Change the Blend Mode to Overlay. (This section might be unnecessary for the colors you are using, I just had to do it for this particular color).
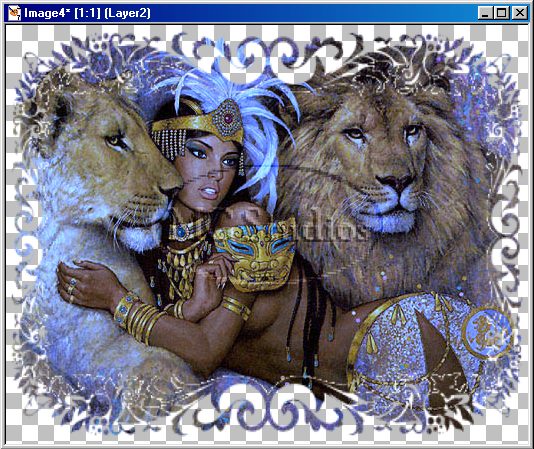
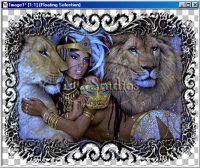
That is all. You are done. If you used the same image I did and followed the tutorial exactly, your finished image will look like this:
To get the final graphic on top of the page, I resized it to 362x292, and
sharpened twice. I hope this was helpful and easy to use.
Click here to see alternative results
This tutorial is property of and ©2002 MG Studios
No portion of this tutorial or its graphics may be reproduced, copied, or
uploaded to any other site without prior written permission & proper credit.
PSP lists are welcome to provide their members a link to this page, but the page
itself is not to be passed around through email, either through lists or personally.
If you would like to request permission to post this tutorial at your site (as is,
with all credits intact) email me here.
Back Home
| | | | |